
Chapter 3Setting Up Your Workspace: Tools, Keys, and Environments
Every craft has a moment before the real work begins, when you lay out your tools and make sure everything is where it should be. A clean, repeatable setup is not glamorous, but it is the difference between spending your evenings building agents and spending them fighting error messages. In this chapter we install everything you need, one piece at a time, and we explain *why* each piece exists so that nothing feels like magic. By the end you will have a working environment and you will have made your very first call to a language model.
Why a Good Setup Matters
Imagine a chef who, every time they cook, has to hunt for a knife, sharpen it, find a clean cutting board, and clear space on the counter before they can even start. They would be exhausted before the first onion was chopped. Professional kitchens avoid this with mise en place — French for "everything in its place." Tools are arranged once, deliberately, so that during the real work the chef never has to stop and search.
Programming is the same. The setup in this chapter is your mise en place. We do it carefully, once, and from then on starting a new project takes a couple of minutes instead of an afternoon. If you have never installed a programming language before, do not worry: we go slowly, we check our work at every step, and there is a troubleshooting section at the end for the moments that inevitably go sideways.
The Tools You Need (and Why)
We will install four things. It helps to know up front what each one is for, so here is the whole shopping list in plain language before we touch anything.
- Python — the main programming language of AI. Almost every AI library you will ever use is written for it.
- Node.js — lets you run JavaScript outside a web browser. We use a little JavaScript in this book, and the document generator that built this very book is written in it.
- A code editor — the program you actually write code in. We recommend Visual Studio Code ("VS Code"), which is free.
- Access to a language model — the "brain" your agents will use. For now we reach it over the internet through an API, which we explain shortly.
Why Python for AI?
You could build AI in many languages, but the entire ecosystem — the libraries, the tutorials, the example code, the community — has gathered around Python. When a new technique appears, the first usable code for it is almost always Python. Choosing Python is not about the language being perfect; it is about standing where the crowd is, so that help is always nearby.
Why a little JavaScript too?
Agents often live inside web applications, and a great deal of tooling — including parts of the agent frameworks you will meet later — is written in JavaScript. We will not go deep, but a basic comfort with it widens the doors open to you. If you only ever learn Python, you will still be able to follow every core idea in this book.
Installing Python
First, check whether Python is already on your computer. Open a terminal (on Windows this is "Command Prompt" or "PowerShell"; on macOS it is "Terminal"; on Linux you already know where it is) and type the following, pressing Enter afterward.
python3 --version
# If that says "command not found", try:
python --version
If you see something like Python 3.11.5, you already have it and can skip ahead. Any version starting with 3.10 or higher is fine for this book. If instead you see an error, or a version starting with 2, you need to install a current version.
Go to the official website, python.org, click Downloads, and run the installer for your operating system. The installer is a normal click-through, with one critical exception on Windows described in the warning below.
After installing, close and reopen your terminal — this matters, because a terminal only learns about newly installed programs when it starts. Then verify the installation:
python3 --version
# Should print something like: Python 3.12.2
Installing Node.js
Go to nodejs.org and download the version labelled LTS (Long-Term Support). LTS means "stable and well-tested," which is exactly what you want — avoid the version labelled "Current," which is more experimental. Run the installer with its default options, then close and reopen your terminal and verify:
node --version
npm --version
# You should see two version numbers, e.g. v20.11.1 and 10.2.4
That second command, npm, is the Node Package Manager — it installs JavaScript libraries, much as we will use pip to install Python libraries in a moment. Installing Node.js gives you both automatically.
Installing a Code Editor
You can technically write code in any text editor, but a proper code editor saves you constant small frustrations: it colors your code so mistakes stand out, warns you about errors as you type, and lets you run programs without leaving the window. Download Visual Studio Code from code.visualstudio.com and install it.
Virtual Environments: Your Project's Private Bubble
Here is a problem that bites almost every beginner eventually. Project A needs version 1 of some library. Project B, started months later, needs version 2 of the same library. If both projects share one big pile of installed libraries, upgrading for Project B silently breaks Project A. This tangle is common enough that programmers have a name for it: dependency hell.
The fix is a virtual environment: a private, isolated bubble of installed libraries that belongs to one project only. Think of it as giving each project its own labelled toolbox instead of throwing every tool into one giant drawer. What you install in one project's bubble cannot disturb another. Python has this ability built in, so there is nothing extra to download.
Creating and activating a virtual environment
Make a folder for your project, move into it, and create the environment. The name .venv is a widely used convention — the leading dot keeps it tidily hidden.
# Create a project folder and move into it
mkdir my-first-agent
cd my-first-agent

# Create the virtual environment (a folder named .venv)
python3 -m venv .venv
Creating it is not enough; you must activate it so that this terminal starts using the bubble. The command differs slightly by operating system:
# macOS / Linux
source .venv/bin/activate

# Windows (PowerShell)
.venv\Scripts\Activate.ps1

# Windows (Command Prompt)
.venv\Scripts\activate.bat
When it works, your terminal prompt changes to show (.venv) at the start of the line. That little label is your confirmation that the bubble is active and any libraries you now install will go into this project alone.
Installing Packages with pip
A package (or library) is a bundle of pre-written code that someone else built and shared, so you do not have to write everything yourself. pip is the tool that downloads and installs Python packages into your active virtual environment. With your bubble activated, install the two packages we need to talk to a language model and to manage secrets:
# Make sure your prompt shows (.venv) first!
pip install anthropic python-dotenv
Here anthropic is one provider's official library for calling their models — you can swap it for another provider's package later — and python-dotenv is a small helper for loading secrets, which we use in the next section. To record exactly which packages your project relies on, so that you (or anyone else) can recreate the environment perfectly, save the list to a file:
pip freeze > requirements.txtNow anyone can reproduce your setup with pip install -r requirements.txt. This habit of pinning your dependencies is what separates a project that still runs in a year from one that mysteriously breaks.
API Keys: Your Secret Password
To use a hosted language model, you send your request over the internet to the provider's servers. They need to know two things: that the request is really from you, and whose account to bill for it. Both jobs are handled by an API key — a long string of random-looking characters that acts as your password to the service.
Think of an API key like the magnetic key card for a hotel room. Anyone holding it can open the door and run up charges on the room, no questions asked. The card does not care who is holding it — only that it is valid. Your API key works the same way, which is exactly why it must be guarded.
To get one, sign up for an account with a model provider, open their dashboard, find the section usually labelled API Keys, and create a new key. The provider will show you the key once. Copy it somewhere safe immediately, because for security reasons most providers never show it to you again — if you lose it, you simply create a new one.
Keeping Secrets Safe: Environment Variables and .env
It is tempting to paste your key directly into your code so it "just works." Resist this. The moment that code is shared, copied, or uploaded to a site like GitHub, your secret travels with it. The professional habit is to keep secrets out of the code entirely and load them from the surrounding environment at run time.
The .env file
Create a file named exactly .env (just an extension, no name before the dot) in your project folder. Inside it, store your key as a named value:
# .env  — this file holds secrets and must never be shared
ANTHROPIC_API_KEY=sk-your-real-key-goes-here
The python-dotenv package you installed earlier reads this file and makes its values available to your program, without the key ever appearing in your actual code. You will see exactly how in the first-call example below.
Hide it from version control
If you use Git to track your project (a tool for saving versions of your code, covered later), you must tell it to ignore your secrets file. Create a file named .gitignore and add these lines:
# .gitignore — files Git should never track
.env
.venv/
__pycache__/Your First API Call
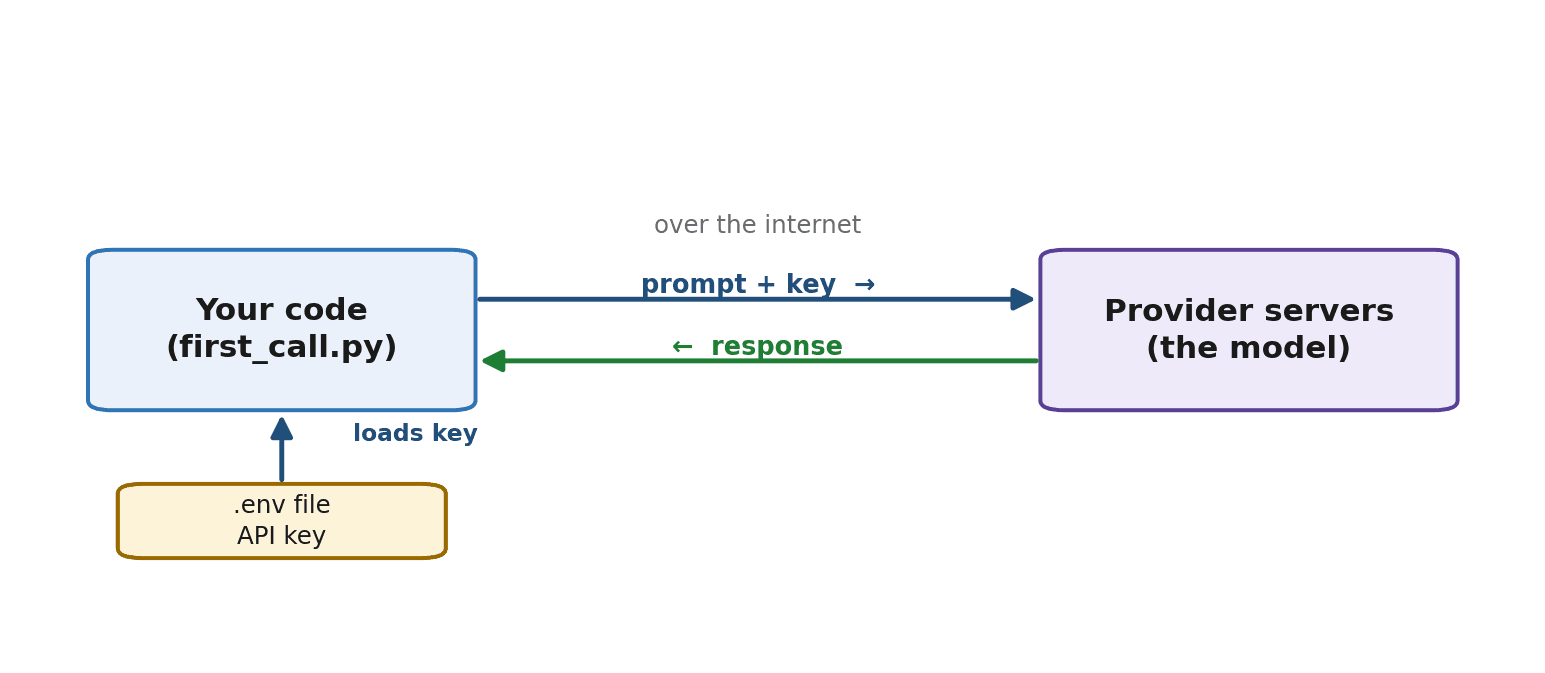
Everything is in place. Let us put it together and ask a language model a question — the moment your environment proves it actually works. First, here is the journey your request takes, so the code makes sense:
The code
In your project folder, create a file called first_call.py and type the following. We will walk through it line by line afterward.
import os
from dotenv import load_dotenv
from anthropic import Anthropic

# 1. Load the secrets from your .env file into the environment
load_dotenv()

# 2. Create a client; it reads your key from the environment
client = Anthropic(api_key=os.environ["ANTHROPIC_API_KEY"])

# 3. Send a message to the model and wait for the reply
response = client.messages.create(
    model="claude-sonnet-4-6",
    max_tokens=300,
    messages=[
        {"role": "user", "content": "Explain what an AI agent is in two sentences."}
    ],
)

# 4. Print just the text of the reply
print(response.content[0].text)
Reading it in order: step 1 loads your .env file so the key becomes available. Step 2 creates a client, the object that knows how to talk to the provider, handing it your key from the environment rather than from the code itself. Step 3 sends a list of messages — here a single message from the user — and specifies which model to use and a max_tokens cap that limits how long the reply can be. Step 4 digs the text out of the structured response and prints it.
Running it
With your virtual environment still active, run the file from your terminal:
python first_call.pyAfter a brief pause while your request travels to the servers and back, you should see a two-sentence explanation printed in your terminal. If you do, congratulations — your workspace is fully operational and you have just had your first real conversation with a model from your own code. If you do not, the next section is for you.
When Things Go Wrong: A Troubleshooting Checklist
Setup problems are completely normal and almost never serious. Here are the errors you are most likely to meet, each with its plain-language cause and fix.
- "command not found: python" or "node" — the program is not installed, or your terminal was open before you installed it. Close and reopen the terminal first; if that fails, reinstall and, on Windows, make sure "Add to PATH" was ticked.
- "ModuleNotFoundError: No module named 'anthropic'" — your virtual environment is not active, or the package was installed somewhere else. Check that your prompt shows
(.venv), then run thepip installcommand again. - An authentication or 401 error — your API key is missing, mistyped, or revoked. Confirm your
.envfile exists, the key name matches what the code looks for, and the key is still valid in your provider's dashboard. - "KeyError: 'ANTHROPIC_API_KEY'" — your program could not find the key in the environment. Make sure
load_dotenv()runs before you read the key, and that the variable name in.envexactly matches the one in your code. - A rate-limit or quota error — you have sent too many requests too quickly, or your account has no credit. Wait a moment and try again, and check your billing and usage page.
A Repeatable Project Template
Now that you understand each piece, here is the whole routine condensed into a checklist you can follow for every future project. After a few projects this becomes muscle memory.
- Make a project folder and move into it:
mkdir my-project && cd my-project. - Create and activate a virtual environment:
python3 -m venv .venvthen the activate command for your system. - Install the packages you need with
pip install ..., then save them withpip freeze > requirements.txt. - Create a
.envfile and add your API key to it. - Create a
.gitignorefile and list.envand.venv/inside it. - Write your code, loading secrets with
load_dotenv(), and run it.
Summary
You have built a proper workspace from nothing: you installed Python, Node.js, and a code editor; you learned why virtual environments keep projects from interfering with one another; you installed your first packages; you obtained an API key and, crucially, learned to guard it with a .env file kept out of version control; and you made a real call to a language model from your own machine. This foundation will carry you through the entire rest of the book.
In the next chapter we refresh the small slice of programming you need to be comfortable with before we start building in earnest — nothing overwhelming, just the exact tools you will actually use.
Exercises
- 1Install Python, Node.js, and VS Code. In a notes file, paste the output of `python3 --version`, `node --version`, and `npm --version` to confirm all three are working.
- 2Create a new project folder, set up and activate a virtual environment, and confirm that your terminal prompt shows the `(.venv)` label. Write down the exact activate command for your operating system so you never have to look it up again.
- 3Obtain an API key from a model provider and set a monthly spending limit in your account. Store the key in a `.env` file and create a `.gitignore` that excludes it. Explain in one sentence why the `.gitignore` step matters.
- 4Write and run the `first_call.py` example. Save the model's reply to a text file, then change the question in the `messages` list and run it again to confirm you understand where the prompt lives.
- 5Deliberately break your script in three ways — deactivate the virtual environment, mistype the key name in `.env`, and remove `load_dotenv()` — and record the exact error each one produces. Being able to recognize these errors will save you hours later.
- 6Using the six-step checklist, set up a brand-new empty project from scratch without looking back at the chapter. Time yourself; aim to get it under five minutes.