
Chapter 21Fine-Tuning Your First Model
Having decided that fine-tuning is genuinely the right tool, it is time to do it. This chapter is a hands-on walkthrough of fine-tuning a model from start to finish: preparing your data, choosing a base model, setting the key knobs, training, and — crucially — checking whether it actually worked. We keep the code at a practical, illustrative level, because the exact libraries change, but the *workflow* is durable. By the end you will understand every step well enough to fine-tune a small model yourself and to read any fine-tuning tutorial without feeling lost.
What Fine-Tuning Actually Does
Strip away the tooling and fine-tuning is exactly the training loop from Chapter 8 — forward pass, loss, backpropagation, update — with one difference: instead of starting from random weights, you start from a model that has already been pretrained. You are not teaching from scratch; you are gently adjusting an already-capable model so that its behavior shifts toward the examples you show it. Everything you learned about loss, gradients, learning rates, and overfitting applies directly here.
The Ingredients You Need
Four things go into a fine-tuning run. A base model to start from (a pretrained model, ideally a small open one for your first attempts). A prepared dataset in the instruction format from Chapter 17, cleaned per Chapter 16. Some compute — a GPU, since training is far heavier than running a model. And a training setup, which today is mostly provided by a library that hides the low-level loop. Gather these and you are ready.
The Fine-Tuning Workflow
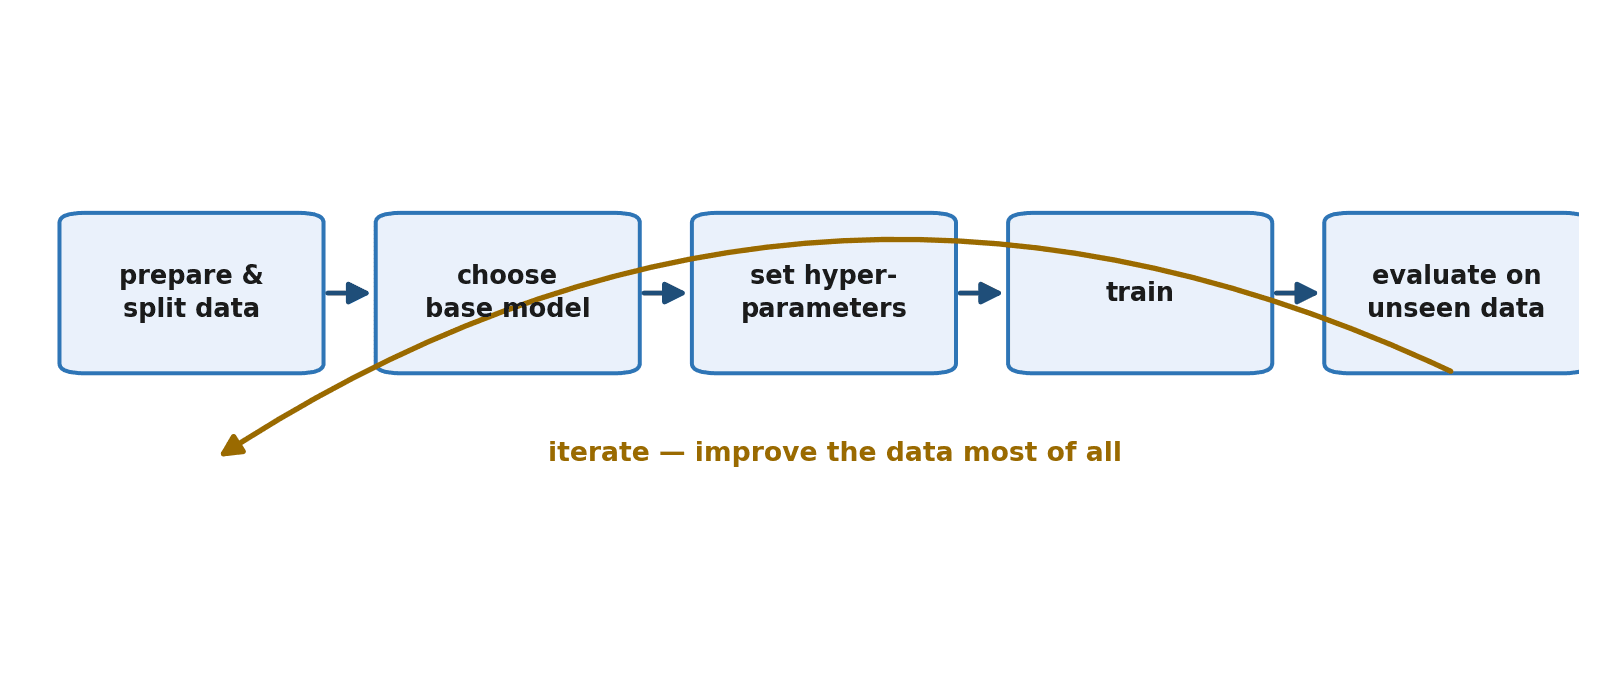
Fine-tuning follows a clear, repeatable sequence, and we will take each step in turn: prepare your data, choose a base model, set the key knobs, train, evaluate, and iterate. The last step matters more than beginners expect — fine-tuning is rarely one-and-done.
Step 1: Prepare and Split Your Data
You begin with the clean, consistently formatted instruction dataset from Chapter 17. One essential addition: you must split it into a part to train on and a separate part to evaluate on — the held-out set from Chapter 6 that the model never sees during training. Without it, you cannot tell whether the model truly learned or merely memorized.
import json, random

# Load the instruction dataset (one JSON object per line)
data = []
with open("instructions.jsonl") as f:
    for line in f:
        data.append(json.loads(line))

random.shuffle(data)
split = int(len(data) * 0.9)
train_data = data[:split]     # 90% for training
eval_data  = data[split:]     # 10% held out, never trained on
print(len(train_data), "train /", len(eval_data), "eval")
Step 2: Choose a Base Model
For your first fine-tune, choose a small, open model (recall Chapter 14). A small model trains faster, costs less, and can often run on hardware you already have, which makes the inevitable experimentation painless. You can graduate to larger models once the workflow is familiar. There is no virtue in starting big; you will only wait longer for each mistake.
Step 3: Set the Key Knobs (Hyperparameters)
Training is controlled by a handful of settings called hyperparameters. Three matter most at the start, and you already understand the most important one.
- Learning rate — the step size from Chapter 8. Too high and training is unstable; too low and it barely learns. For fine-tuning it is usually kept small, because you are gently adjusting an already-good model, not training from scratch.
- Epochs — how many times the model passes over your whole dataset. Too few and it underfits; too many and it overfits, memorizing your examples. A small number is often enough for fine-tuning.
- Batch size — how many examples the model looks at before each weight update. Mostly a matter of fitting your hardware's memory.
Step 4: Train
Modern libraries hide the training loop behind a high-level interface: you hand over the model, the data, and the hyperparameters, and it runs the forward-pass-loss-backprop-update cycle for you, across all your examples and epochs. The exact names differ between libraries, but the shape is always the same as the illustrative call below.
# Illustrative -- the exact library and names vary, the shape does not.
trainer = Trainer(
    model=base_model,
    train_data=train_data,
    eval_data=eval_data,
    learning_rate=1e-5,    # small, because we are adjusting a trained model
    epochs=3,
    batch_size=8,
)

trainer.train()           # runs the Chapter 8 loop for you, under the hood
trainer.save("my-fine-tuned-model")
As it trains, watch the loss curve from Chapter 8. A healthy run shows the training loss falling and then leveling off. Keep an eye on the loss measured on your held-out evaluation data too — if training loss keeps dropping while evaluation loss starts rising, that is the unmistakable signature of overfitting.
Step 5: Evaluate the Result
Training finishing is not the same as training succeeding. Now you test the fine-tuned model on the held-out examples it never saw, and on fresh cases you write by hand, comparing its behavior before and after fine-tuning. Did it actually learn the behavior you wanted? Does it still handle things outside your narrow dataset? This is verification, and Chapter 25 is devoted to doing it properly.
Step 6: Iterate
Fine-tuning is a loop, not a line. You look at where the model still fails, and — almost always — you fix the data: add examples covering the failure cases, remove low-quality or contradictory examples, improve formatting, increase diversity. Then you retrain and re-evaluate. Experienced practitioners spend most of their fine-tuning effort on the dataset, because that is where the real leverage lives. The knobs are a sideshow; the data is the main act.
Signs of Trouble
Three failure patterns recur, and you now have the background to recognize all of them.
- Overfitting — the model aces your training examples but fails on anything new. Usually too many epochs or too little data. Train for fewer epochs, or gather more and more varied examples.
- Catastrophic forgetting — fine-tuning too hard on a narrow task makes the model lose general abilities it had before, like a specialist who has forgotten the basics. Gentler training and a less narrow dataset help.
- Too little or low-quality data — the model barely changes, or learns the wrong lesson. Remember from Chapter 17 that the model imitates your examples exactly, flaws and all.
The Easier Path: Hosted Fine-Tuning
You do not always have to manage the hardware yourself. Many providers offer hosted fine-tuning: you upload your prepared dataset through an API, they run the training on their infrastructure, and you receive a custom model you can call like any other. This removes the GPU and setup burden entirely and is often the most practical route for an individual builder — letting you focus on the part that matters most, your data.
Summary
Fine-tuning is the Chapter 8 training loop applied to an already-pretrained model, gently shifting its behavior toward your examples. You need a base model, a clean and properly split dataset, some compute, and a training setup. The workflow is: prepare and split your data, choose a small base model to start, set a few hyperparameters (a small learning rate, a few epochs, a workable batch size), train while watching the loss curve, evaluate honestly on unseen data, and iterate — improving the data far more than the knobs. Watch for overfitting, catastrophic forgetting, and weak data, and consider hosted fine-tuning to skip the infrastructure entirely.
Fine-tuning every weight of a large model is costly. Chapter 22 introduces the clever techniques — LoRA and friends — that let you fine-tune even big models on modest hardware by changing only a tiny fraction of them.
Exercises
- 1Take a small instruction dataset (your own from Chapter 17, or any you can find) and write the code to load it and split it into a 90% training set and a 10% held-out evaluation set. Confirm the two sets do not overlap.
- 2Explain why the learning rate for fine-tuning is usually kept small. Connect your answer to what fine-tuning is doing differently from training from scratch.
- 3Describe what you would watch for in the training and evaluation loss curves during a run, and what pattern would tell you the model is overfitting.
- 4If you have access to a GPU or a hosted fine-tuning service, fine-tune a small model on a tiny dataset and record the final training loss. If not, write out the step-by-step plan you would follow.
- 5Test a model on five examples it has never seen and compare its answers before and after a hypothetical fine-tune. What specifically would you look for to decide whether the fine-tune helped?
- 6Explain catastrophic forgetting in your own words, and describe two changes to your training that would reduce the risk of it.